|
Steps to follow:
| 1. | Set the IP address and the network settings of the Ethernet adapter |
| 2. | Setup the drive/motor for RS-232 communication with the Ethernet adapter |
| 3. | Set EasyMotion Studio for communication via Ethernet |
Step 1 Set the IP address and the network settings of the Ethernet adapter
The Ethernet adapter accepts both dynamic and static IP addresses. The DHCP and Auto IP are enabled by default. Contact your network administrator to obtain the IP address assigned by the DHCP server.
The IP settings of the Ethernet adapter can be set/changed in 2 3ways:
| • | using the DeviceInstaller software when the IP address is unknown. The DeviceInstaller can be downloaded from the Lantronix web page: |
Step 2 Setup the drive/motor for RS-232 communication
| 1. | Power-Off your drive/motor and the Ethernet adapter |
| 2. | Connect the Ethernet adapter with the Technosoft drive/motor through an RS-232 serial cable. The adapter has the same type of DB9 connector as a PC. Hence the connections are the same: If the drive/motor is equipped with a standard 9-pin DB9 connector for serial communication, use a 9-wire standard serial cable: male-female, non-inverting (e.g. one-to-one), else check the drive/motor user manual for cable connections. |
| 3. | If the drive/motor supports also RS-485 communication, set the RS-232/RS-485 switch (or solder-joint) to the position RS-232. |
Step 3. Set EasyMotion Studio for communication via Ethernet

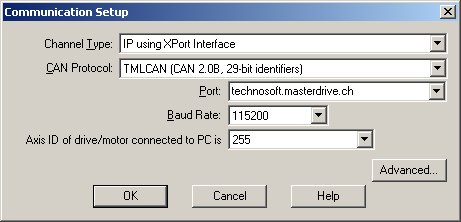
| 1. | Select menu command “Communication | Setup” |
| 2. | Select at “Channel Type” – IP using XPort interface. |
| 3. | Select the “CAN Protocol” between the drives/motors connected in the CAN-bus network, the drive connected to the Ethernet adapter acting as a retransmission relay (see Communication Protocols). You can choose either TMLCAN (CAN2.0B, 29-bit identifier) or CANopen or TechnoCAN (CAN2.0A, 11bit identifier). |
| 4. | Set at “Port” the address of the Ethernet adapter using IP address or the URL address |
| 5. | Select the desired baud rate for serial communication between the adapter and drive/motor from “Baud Rate” list |
| 6. | Set the “Axis ID of the drive/motor connected to PC”. The default option is autodetected enabling EasyMotion Studio to detect automatically the axis ID of the drive connected to the serial port of the Ethernet adapter. If your drive/motor doesn’t support this feature (see remark below) select its axis ID from the list. The drives/motors axis ID is set at power on using the following algorithm: |
| a. | With the value read from the EEPROM setup table containing all the setup data |
| b. | If the setup table is invalid, with the last axis ID value read from a valid setup table |
| c. | If there is no axis ID set by a valid setup table, with the value read from the hardware switches/jumpers for axis ID setting |
| d. | If the drive/motor has no hardware switches/jumpers for axis ID setting, with the default axis ID value which is 255. |
Remark: When the TechnoCAN communication protocol is used the Axis IDs of the drives/motors and the PC are interpreted as modulo 32.
If the communication works properly, you’ll see displayed on the status bar (the bottom line) of the EasyMotion Studio the text “Online”, the axis ID of the drive/motor and the firmware version read from the drive/motor.
Remark: If your drive/motor has firmware number:
| • | Starts with 1 – examples: F100A, F125C, F150G, etc., or |
| • | Starts with 0 or 9 and has a revision letter below H – examples: F000F, F005D, F900C |
you can’t use the axis ID autodetected option.
See also:
Ethernet Communication Troubleshoots
Advanced Communication Setup
Communication Setup
|
