Steps to follow:
| 1. | Implement the serial driver accordingly with the tmlcomm.dll interface |
| 2. | Setup the drive/motor for RS-232 communication |
| 3. | Set EasyMotion Studio for communication via user implemented serial driver with the drive/motor |
Step 1 Implement the serial driver
| In the main function of the dll initialize the communication channel with the serial settings implemented on the Technosoft drives/motors: 8 data bits, 2 stop bits, no parity, no flow control and one of the following baud rates: 9600 (default after reset), 19200, 38400, 56600 and 115200. |
| Implement the functions for interfacing your communication driver with tmlcomm. This functions are: |
bool __stdcall ReadData(BYTE* pData, DWORD dwBufSize, DWORD* pdwBytesRead)
bool __stdcall WriteData(const BYTE* pData, DWORD dwBufSize, DWORD* pdwBytesWritten)
int __stdcall GetBytesCountInQueue()
void __stdcall PurgeQueues()
DWORD __stdcall GetCommBaudRate()
bool __stdcall SetCommBaudRate(DWORD nNewBaudRate)
where:
pData |
Pointer to buffer from/to the data is read/wrote |
dwBufsize |
Parameter specifying the number of bytes to be read/write from/to serial port |
pdwBytesRead |
Pointer to the variable that contains the number of bytes read |
pdwBytesWritten |
Pointer to the variable that contains the number of bytes written |
nNewBaudRate |
Variable that contains the new value for serial baud rate |
| Export the functions from the communication driver using a module-definition (.DEF) file with the following content: |
LIBRARY "virtRS232"
DESCRIPTION 'Example of a virtual serial driver for tmlcomm.dll'
EXPORTS
; Explicit exports can go here
ReadData
WriteData
GetBytesCountInQueue
PurgeQueues
GetCommBaudRate
SetCommBaudRate
Step 2 Setup the drive/motor for RS-232 communication
| 1. | Power-Off your drive/motor |
| 2. | In order to use the RS-232 communication, you need to connect your PC with the Technosoft drive/motor through an RS-232 serial cable. If the drive/motor is equipped with a standard 9-pin DB9 connector for serial communication, use a 9-wire standard serial cable: male-female, non-inverting (e.g. one-to-one), else check the drive/motor user manual for cable connections. |
| 3. | If the drive/motor supports also RS-485 communication, set the RS-232/RS-485 switch (or solder-joint) to the position RS-232. |
| 4. | Power-On the drive/motor |

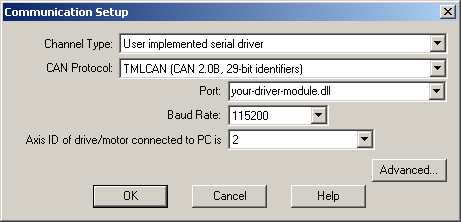
Step 3 Set EasyMotion Studio for communication via user implemented serial driver with the drive/motor
| 1. | Select menu command “Communication | Setup” |
| 2. | Select User implemented serial driver at “Channel Type”. |
| 3. | Select the “CAN Protocol” between the drives/motors connected in the CAN-bus network, the drive/motor connected to PC acting as a retransmission relay (see Communication Protocols). You can choose either TMLCAN (CAN2.0B, 29-bit identifier) or CANopen or TechnoCAN (CAN2.0A, 11bit identifier). |
| 4. | Specify at “Port” the communication dll you implemented |
| 5. | Select the desired baud rate from “Baud Rate” list |
| 6. | Set the “Axis ID of the drive/motor connected to PC”. The default option is autodetected enabling EasyMotion Studio to detect automatically the axis ID of the drive connected to the serial port. If your drive/motor doesn’t support this feature (see remark below) select its axis ID from the list. The drives/motors axis ID is set at power on using the following algorithm: |
| a. | With the value read from the EEPROM setup table containing all the setup data |
| b. | If the setup table is invalid, with the last axis ID value read from a valid setup table |
| c. | If there is no axis ID set by a valid setup table, with the value read from the hardware switches/jumpers for axis ID setting |
| d. | If the drive/motor has no hardware switches/jumpers for axis ID setting, with the default axis ID value which is 255. |
Remark: When the TechnoCAN communication protocol is used the Axis IDs, of the drives/motors and of the PC, are interpreted as modulo 32.
| 7. | Press the OK button |
If the communication works properly, you’ll see displayed on the status bar (the bottom line) of the EasyMotion Studio the text “Online”, the axis ID of the drive/motor and the firmware version read from the drive/motor.
Remark: If your drive/motor firmware number:
| • | Starts with 1 – examples: F100A, F125C, F150G, etc., or |
| • | Starts with 0 or 9 and has a revision letter below H – examples: F000F, F005D, F900C |
you can’t use the axis ID autodetected option.
See also:
User Implemented Serial Driver Example