|
Steps to follow:
| 1. | Setup the drives/motors for CAN-bus communication |
| 2. | Mount on/connect to your PC a CAN-bus interface board |
| 3. | Install on your PC an CAN-bus software driver |
| 4. | Build the CAN-bus network |
| 5. | Set EasyMotion Studio for communication via CAN-bus with the drives/motors |
Step 1. Setup the drives/motors for CAN-bus communication
| 1. | Power-Off the drive/motor |
| 2. | Choose a different axis ID for each drive/motor and also different from the axis ID of PC (which is set by default at 255). The drives/motors axis ID is set at power on using the following algorithm: |
| a. | With the value read from the EEPROM setup table containing all the setup data |
| b. | If the setup table is invalid, with the last axis ID value read from a valid setup table |
| c. | If there is no axis ID set by a valid setup table, with the value read from the hardware switches/jumpers for axis ID setting |
| d. | If the drive/motor has no hardware switches/jumpers for axis ID setting, with the default axis ID value which is 255. |
Remarks:
| • | If your drive/motor has no hardware switches/jumpers for axis ID setting, you must program the desired axis ID in the drive/motor setup table. You can do this operation from Easy Motion Studio – the setup part of an application, where you can select the axis ID to be saved in the drive/motor setup table from the EEPROM. Use the RS-232 communication to download the setup data. |
| • | When the TechnoCAN communication protocol is used the Axis IDs, of the drives/motors and of the PC, are interpreted as modulo 32. |
Step 2. Mount on your PC a CAN-bus interface board
EasyMotion Studio offers the possibility to choose one of the following PC to CAN-bus interfaces:
| • | IxxAT PC to CAN interface |
| • | Sys Tec USB to CAN interface |
| • | LAWICEL CANUSB interface |
| • | PEAK System PCAN-PCI interface |
| • | PEAK System Dongle interfaces |
| o | Dongle using SPP/EPP protocol |
| o | Dongle with SJA chipset using SPP/EPP protocol |
| o | Dongle Pro with SJA chipset using SPP/EPP protocol |
Step 3. Install on your PC a CAN-BUS software driver
In order to use a CAN-bus interface you need to install on your PC the CAN-bus driver for the chosen interface. For each CAN-bus interface, the producer provides the driver as well as the installation guidelines. You can find detailed information regarding the above interfaces and their installation on the following web pages: www.ixxat.com, www.systec-electronic.de, www.peak-system.com, www.esd-electronics.com and www.canusb.com (Lawicel interface).
Remarks: For the CAN-bus interfaces from PEAK System you must copy the DLL interface provided in the folder where EasyMotion Studio was installed.
Step 4. Build the CAN-bus network
Each drive/motor manual shows how to do the connections in order to build a CAN-bus network.
Step 5. Set EasyMotion Studio for communication via CAN-bus with the drives/motors

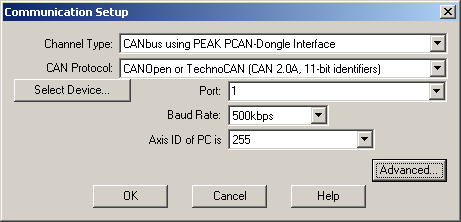
| 1. | Select menu command “Communication | Setup” |
| 2. | Select at “Channel Type” the CAN-bus option corresponding to your interface. For IXXAT CAN-bus interface, PEAK PCAN-ISA, PCAN-PC/104 and PEAK PCAN-Dongle interfaces press “Select Device…” button to choose the hardware model corresponding to your device. |
| 3. | Select the “CAN Protocol” used by the PC to communicate with the drives/motors connected in the CAN-bus network. You can choose either TMLCAN (CAN2.0B, 29-bit identifier) or CANopen or TechnoCAN (CAN2.0A, 11bit identifier). |
| 4. | Depending on the CAN-bus interface used, you have more or less ports available. Select from “Port” the device where you have connected the CAN-bus |
Remark: For Sys Tec USB to CAN interface the port number must be the same with the device number set with the device configuration utility.
| 5. | Select the CAN-bus interface baud rate from “Baud Rate” drop list |
Remark: The baud rate selection refers ONLY to the CAN-bus interface on the PC. It doesn’t change the CAN baud rate on the drives/motors. The default baud rate on CAN-bus for the Technosoft drives/motors is 500kbps.
| 6. | Select at “Axis ID of PC is” an address for the PC. By default the value proposed is 255. Attention! Make sure that all the drives/motors from the network have a different address. When the CANopen or TechnoCAN communication protocol is used the Axis IDs of the drives/motors and of the PC are interpreted as modulo 32. |
If the CAN interface mounted on the PC works properly, you’ll see displayed on the status bar (the bottom line) of the EasyMotion Studio the text “Online” and the axis ID of the PC.
See also:
CAN-bus Communication Troubleshoots
Advanced Communication Setup
Communication Setup
| 