The “Motion – Linear Interpolation” dialog allows you to program a 2D/3D positioning path described through a series of linear segments. Vector speed and acceleration can be also specified for each segment. The motion controller splits each path segment in PVT (Position, Velocity and Time) points and sends them to the slave axes. On receiving the PVT points the slaves rebuild the path using 3rd order interpolation.
In the Linear Interpolation mode the slave axes control the load/motor in position. A path sequence must begin when load/motor is not moving and must complete with an end segment – a segment with zero increment.
The Linear Interpolation mode can be used together with a host, which sends the linear segments via a communication channel. An unlimited number of incremental segments may be given in a continuous move sequence, making the linear interpolation mode ideal for following a piece-wise linear path.
Upon reception, each segment is stored in a reception buffer. The reference generator empties the buffer as the segment points are executed. The motion controller automatically sends warning messages when the buffer is full, low or empty. The buffer full condition occurs when the number of segments in the buffer is equal with the buffer size. The buffer low condition occurs when the number of segments in the buffer is less or equal with a programmable value. The buffer empty condition occurs when the buffer is empty and the execution of the last segment is over.
Remarks:
| • | The buffer size is programmable and if needed can be substantially increased. By default it is set to 4 segments. |
| • | The buffer low condition is set by default when the last PVT point from the buffer is read and starts to be executed |
| • | The Linear Interpolation mode requires the slave drives/motors to be setup for position control. Otherwise, the slaves will not be available for X, Y and Z axes selection. |
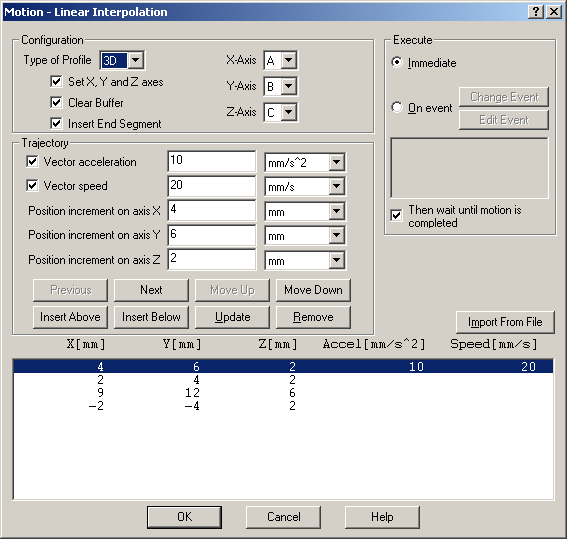
Specify the profile type, 2D or 3D from Type of Profile list. Depending on the profile selected you can Set X, Y and Z axes to define the coordinate plane where the 2D/3D path will be executed. The coordinate plane is defined with X-Axis, Y-Axis and Z-Axis. The X-Axis, Y-Axis and Z Axis lists are populated with the slave axes selected in the Axis Selection view.
The end of the path is signaled with a segment having the position increment equal with zero. If the current path is completely defined in the current motion sequence then check Insert End Segment to add the end segment in the path list.
You can introduce the path segments in 2 ways:
| • | One by one, by setting the Position increment on axis X and Position increment on axis Y for 2D paths and also the Position increment on axis Y for 3D. Additionally you can specify a vector speed and/or acceleration for each segment. Check Vector acceleration and Vector speed and set the values their values. For each parameter select the measuring unit from the list on the right. Use buttons: Insert Above, Insert Below, Update, Remove, Previous, Next, Move Up and Move Down to navigate between the segments and modify them. |
| • | With Import From File to insert a set of segments previously defined. The file format is a simple text with up to 5 columns separated by space or tabs representing from left to right: position increment for X axis, position increment for Y axis, position increment for Z axis (for 3D paths), acceleration and velocity. The number of rows gives the number of segments |
Check Clear Buffer to erase all the previously stored segments from the buffer. Use this option each time when you initiate a new path. Uncheck this option if the execution of the segments was interrupted and you want to resume the execution of the remaining segments.
Choose Execute Immediate to start the programmed motion immediately when the motion sequence is executed. Check Then wait until motion is completed if you want to postpone the start of the following motion until this motion sequence is completed.
Remark: The motion complete condition on the slave axes is set when their reference generator is completing the trajectory received from the motion controller.
Choose Execute On event to start this new motion when a programmable event occurs. Click Change Event to select the event type or Edit Event to modify the parameters of the selected event (see Events for details). Select Setup motion data, but don’t start execution if you want only to set the motion parameters without starting the execution.
OK: Close this dialogue and save the motion sequence in your motion sequence list.
Cancel: Close this dialogue without saving the motion sequence in your motion sequence list.
Help: Open this help page.
See also:
Linear Interpolation– TML Programming Details
Linear Interpolation Mode– Related TML Instructions and Data
Internal Units and Scaling Factors